Installing Kubernetes on Baremetal via CoreOS Tectonic with Grub Booting
At work, we use kube-aws to deploy our Kubernetes clusters running on top of Container Linux inside of AWS. I wanted to be able try new things with Kubernetes in my personal lab without having to rack up huge AWS bills, so that means figuring out a good way to deploy Kubernetes to baremetal in the least painful way. I wanted to try Tectonic because it offers a simplified graphical installer, and that means I also need to install Matchbox to support the baremetal provisioning aspects.
After reading through the entire Tectonic Installation Guide, I realized that it doesn’t cover some of the underlying OS provisioning components as they vary per environment. Since I don’t have that infrastructure as I’m starting from scratch, I had to get that going before continuing the installation. Here’s my summary of steps taken (including a custom dnsmasq container) to round out a full working guide.
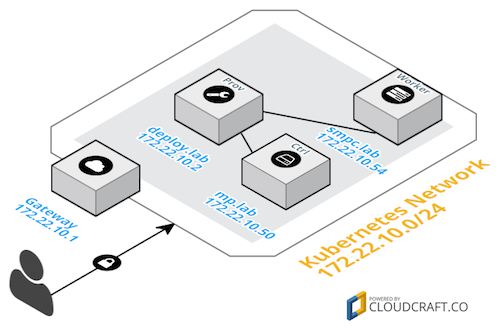
Architecture Overview
My personal lab is a mixture of PCs, 1U servers, and Mac hardware. So, for this lab, I’m going to pick one of each to ensure the entire process would work on all my hardware.
As per the installation guide, Tectonic needs three systems at a minimum. Here are my systems per role:
- Deployment/Provisioning system
deploy.lab-172.22.10.2/24
- Kubernetes Controller
mp.lab-172.22.10.50/24
- Kubernetes Worker
smpc.lab-172.22.10.54/24
Network Diagram
The simplistic network environment is as follows:
Detailed PXE/Netboot to CoreOS Installation Flow
The following describes the complete baremetal provisioning process from DHCP request to CoreOS installation. Configuring the provisioning system to support this workflow is described in the subsequent section.
- Using IPMI or a keyboard during booting, tell the system to “boot from network”. This will cause the NIC to perform a DHCP request and look for TFTP related settings to boot from. In my case, it was
F12for my server and holdingnduring the boot chime for the Mac. - The DHCP server responds with an IP and subnet along with information pointing to the TFTP server and a filename of what to download/run from that TFTP server.
- The system attempts to connect to the TFTP server and download/run that initial file. In the case of
grub2, that initial boot file runs and then also tries to contact the same TFTP server looking for a grub boot configuration. - If a grub boot configuration file is found, it follows that configuration. In the case of
matchbox, it should be a pointing to its web port and passing the NIC’s MAC address:
 1 set default="0"
 2 insmod video_bochs
 3 insmod video_cirrus
 4 insmod all_video
 5 set gfxpayload=keep
 6 insmod gzio
 7 insmod part_gpt
 8 insmod ext2
 9 set timeout=10
10 menuentry 'CoreOS Install' --class os {
11      insmod net
12      insmod http
13      echo 'Loading Linux ...'
14      set root=http,deploy.lab:8080
15      configfile /grub?mac=$net_default_mac
16 }- Since the initial grub configuration does nothing but load an HTTP module and defer to a web address for the rest of the
grubconfiguration, it provides a convenient way to grab a system-specific boot configuration without having to change your TFTP provided configuration file. In this case,Matchboxanswers to web requests at the/grub?mac=XX:XX:XX:XX:XX:XXURL with a tailored boot configuration, like so:
[admin@deploy ~]$ curl http://deploy.lab:8080/grub?mac=00:23:32:2f:40:3c
default=0
fallback=1
timeout=1
menuentry "CoreOS (EFI)" {
  echo "Loading kernel"
  linuxefi "/assets/coreos/1409.5.0/coreos_production_pxe.vmlinuz" coreos.config.url=http://deploy.lab:8080/ignition?mac=$net_efinet0_dhcp_mac coreos.first_boot=yes console=tty0 console=ttyS0
  echo "Loading initrd"
  initrdefi  "/assets/coreos/1409.5.0/coreos_production_pxe_image.cpio.gz"
}
menuentry "CoreOS (BIOS)" {
  echo "Loading kernel"
  linux "/assets/coreos/1409.5.0/coreos_production_pxe.vmlinuz" coreos.config.url=http://deploy.lab:8080/ignition?mac=$net_efinet0_dhcp_mac coreos.first_boot=yes console=tty0 console=ttyS0
  echo "Loading initrd"
  initrd  "/assets/coreos/1409.5.0/coreos_production_pxe_image.cpio.gz"
}- Now that grub knows what to boot, where to get it, and extra kernel parameters for the ignition configuration for what to install inside the OS and how, the system can begin and complete the installation. Here is the ignition configuration that the CoreOS kernel pulls from the
coreos.config.urlURL which basically says to install CoreOS Container Linux and reboot:
[admin@deploy ~]$ curl http://deploy.lab:8080/ignition?mac=00:23:32:2f:40:3c
{
  "ignition": {
    "version": "2.0.0",
    "config": {
    }
  },
  "storage": {
    "files": [
      {
        "filesystem": "root",
        "path": "\/opt\/installer",
        "contents": {
          "source": "data:,%23!%2Fbin%2Fbash%20-ex%0Acurl%20%22http%3A%2F%2Fdeploy.lab%3A8080%2Fignition%3Fmac%3D00%3A23%3A32%3A2f%3A40%3A3c%26os%3Dinstalled%22%20-o%20ignition.json%0Acoreos-install%20-d%20%2Fdev%2Fsda%20-C%20stable%20-V%201409.5.0%20-i%20ignition.json%20-b%20http%3A%2F%2Fdeploy.lab%3A8080%2Fassets%2Fcoreos%0Audevadm%20settle%0Asystemctl%20reboot%0A",
          "verification": {
          }
        },
        "mode": 320,
        "user": {
        },
        "group": {

        }
      }
    ]
  },
  "systemd": {
    "units": [
      {
        "name": "installer.service",
        "enable": true,
        "contents": "[Unit]\nRequires=network-online.target\nAfter=network-online.target\n[Service]\nType=simple\nExecStart=\/opt\/installer\n[Install]\nWantedBy=multi-user.target\n"
      }
    ]
  },
  "networkd": {
  },
  "passwd": {
    "users": [
      {
        "name": "debug",
        "sshAuthorizedKeys": [
          "ssh-rsa AAAAB3NzaC1yc2EAAAADAQABAAAAgQCugz\/eu\/a6U5ZXtYVp9ufCghVSP0Lux\/nP6BgbranKE6r3h3xgqo8yR2LUG9VwH6Vo+BtGgToeww+jbgr3oq9g8\/mQmNvQEefvWyzhYxrpv6q36fdYS0KhQxA6vnpOZZ1M9cZ1q6iPaUryxDUFU3HULDKM4g\/6XBzqBJZ2illyuw=="
        ],
        "create": {
          "groups": [
            "sudo",
            "docker"
          ]
        }
      }
    ]
  }
}- Here are the URL-decoded contents of
/opt/installerfrom inside the ignition configuration above. Notice how it uses theos=installedparameter to pull a “normal” boot configuration specific to this machine for future booting after being installed to disk/dev/sda:
1 #!/bin/bash -ex
2 curl "http://deploy.lab:8080/ignition?mac=00:23:32:2f:40:3c&os=installed" -o ignition.json
3 coreos-install -d /dev/sda -C stable -V 1409.5.0 -i ignition.json -b http://deploy.lab:8080/assets/coreos
4 udevadm settle
5 systemctl reboot- Also, if you notice the name of the user available via SSH during that first boot/installation is
debugand uses the same SSH key as what will be available after the installation completes and is rebooted for the permanent usercore. This is really handy if you are troubleshooting why the installation is failing or want to watch that process as it goes. Note that it’s really only available for a few minutes on quick systems since the installation completes so quickly.
- At this point, CoreOS/Container Linux has been installed to
/dev/sda, a user namedcorewith an SSH key set, and has an ignition configuration that configured its systemd units. This is where Matchbox/Ignition stop and normal SSH-based administration can take over.
Provisioning Infrastructure Configuration
There are several components that run on the deploy.lab system that all need to work in concert for the above process to be successful:
- Matchbox - The CoreOS provided container that handles the web serving of grub, CoreOS, and Igntition templates provided by the Tectonic installer.
- DHCP, DNS, TFTP, Grub Network Boot Images and Configuration - This is handled by a custom container built using
dnsmasq.
Setting up deploy.lab
I hand installed Centos 7.3 with the minimal install and ensured that it had a recent version of Docker with SSH key authentication as the admin user in the docker group:
~$ ssh deploy
[admin@deploy ~]$ groups
admin wheel docker
[admin@deploy ~]$ id
uid=1000(admin) gid=1000(admin) groups=1000(admin),10(wheel),993(docker)
[admin@deploy ~]$ docker version
Client:
 Version:      17.05.0-ce
 API version:  1.29
 Go version:   go1.7.5
 Git commit:   89658be
 Built:        Thu May  4 22:06:25 2017
 OS/Arch:      linux/amd64

Server:
 Version:      17.05.0-ce
 API version:  1.29 (minimum version 1.12)
 Go version:   go1.7.5
 Git commit:   89658be
 Built:        Thu May  4 22:06:25 2017
 OS/Arch:      linux/amd64
 Experimental: false
Installing and Configuring the Matchbox Container on deploy.lab
The matchbox documentation for running via docker is a bit misleading as it actually requires several things to be completed before actually running the container.
First, create the matchbox user and create/own the /var/lib/matchbox directory where it will keep all the assets and profiles.
[admin@deploy ~]$ sudo useradd -U matchbox
[admin@deploy ~]$ sudo mkdir -p /var/lib/matchbox/assets
[admin@deploy ~]$ sudo chown -R matchbox:matchbox /var/lib/matchbox
Download the matchbox package, verify its signature, and untar it:
[admin@deploy ~]$ wget https://github.com/coreos/matchbox/releases/download/v0.6.1/matchbox-v0.6.1-linux-amd64.tar.gz
[admin@deploy ~]$ wget https://github.com/coreos/matchbox/releases/download/v0.6.1/matchbox-v0.6.1-linux-amd64.tar.gz.asc
[admin@deploy ~]$ gpg --keyserver pgp.mit.edu --recv-key 18AD5014C99EF7E3BA5F6CE950BDD3E0FC8A365E
[admin@deploy ~]$ gpg --verify matchbox-v0.6.1-linux-amd64.tar.gz.asc matchbox-v0.6.1-linux-amd64.tar.gz

[admin@deploy ~]$ tar xzvf matchbox-v0.6.1-linux-amd64.tar.gz
[admin@deploy ~]$ cd matchbox-v0.6.1-linux-amd64
Run a script to grab the version(s) of CoreOS/Container Linux to the current directory and then copy them to the assets directory to be available via matchbox on port 8080:
[admin@deploy ~]$ ./scripts/get-coreos stable 1409.5.0 .
[admin@deploy ~]$ sudo cp -r coreos /var/lib/matchbox/assets
Drop out of the matchbox installation directory and run it via docker:
[admin@deploy ~]$ cd ~
[admin@deploy ~]$ docker run --net=host --rm \
    -v /var/lib/matchbox:/var/lib/matchbox:Z \
    -v /etc/matchbox:/etc/matchbox:Z,ro \
    quay.io/coreos/matchbox:latest -address=0.0.0.0:8080 \
    -rpc-address=0.0.0.0:8081 -log-level=debug
Finally, verify that matchbox is running and able to serve up your downloaded CoreOS image(s). If you see this, you should be good to go:
[admin@deploy ~]$ curl http://deploy.lab:8080/assets/coreos/1409.5.0/
<pre>
<a href="CoreOS_Image_Signing_Key.asc">CoreOS_Image_Signing_Key.asc</a>
<a href="coreos_production_image.bin.bz2">coreos_production_image.bin.bz2</a>
<a href="coreos_production_image.bin.bz2.sig">coreos_production_image.bin.bz2.sig</a>
<a href="coreos_production_pxe.vmlinuz">coreos_production_pxe.vmlinuz</a>
<a href="coreos_production_pxe.vmlinuz.sig">coreos_production_pxe.vmlinuz.sig</a>
<a href="coreos_production_pxe_image.cpio.gz">coreos_production_pxe_image.cpio.gz</a>
<a href="coreos_production_pxe_image.cpio.gz.sig">coreos_production_pxe_image.cpio.gz.sig</a>
</pre>
Installing and Configuring the DNSMasq (DNS, DHCP, TFTP, Grub) Container on deploy.lab
It’s easiest to grab a copy of the repo and build your own docker image locally.
[admin@deploy ~]$ git clone https://github.com/bgeesaman/maas
[admin@deploy ~]$ cd maas
Edit the files in files directory as needed. Most changes are IP addresses, MAC addresses, and hostnames for your environment:
[admin@deploy maas]$ vi files/dnsmasq.conf
[admin@deploy maas]$ vi files/grub/*
Finally, build and run the image:
[admin@deploy maas]$ ./buildandrun.shRunning the Tectonic Installer
With the above in place and a free license from CoreOS for Tectonic, you can now follow the Tectonic Baremetal with Graphical Installer guide having satisfied the pre-requisites–with one exception.
-
Grub-specific Gotcha
The Tectonic installer will run you through several steps of supplying configuration and will arrive at a point where it instructs you to “power on your systems” that are to be baremetal booted from the network, but it won’t work out-of-the-box. The details are in this github issue for what is happening to prevent
grubfrom working by default. The good news is that there is a simple workaround. On thedeploy.labsystem, this is the default profile that the Tectonic GUI installer places into your/var/lib/matchbox/profilesfolder:
[admin@deploy ~]$ cat /var/lib/matchbox/profiles/coreos-install.json
{
	"id": "coreos-install",
	"ignition_id": "coreos-install.yaml.tmpl",
	"boot": {
		"kernel": "/assets/coreos/1409.5.0/coreos_production_pxe.vmlinuz",
		"initrd": [
			"/assets/coreos/1409.5.0/coreos_production_pxe_image.cpio.gz"
		],
		"args": [
			"coreos.config.url=http://deploy.lab:8080/ignition?uuid=${uuid}\u0026mac=${mac:hexhyp}",
			"coreos.first_boot=yes",
			"console=tty0",
			"console=ttyS0"
		]
	}
}
Notice the args section. When the system is booting from the network and pulls the /grub?mac=XX:XX:XX:XX:XX:XX configuration, this args list is directly dropped into the kernel line. However, the uuid and mac:hexhyp variables are ipxe boot environment specific. For grub2, it actually varies slightly. To fix this, we need to make some customizations to the matchbox groups configuration files. I chose to make one for each system based on the mac address selector. Notice that I now reference the coreos-install-mp or coreos-install-smpc profiles:
[admin@deploy ~]$ cat /var/lib/matchbox/groups/coreos-install-mp.json
{
	"id": "coreos-install-mp",
	"profile": "coreos-install-mp",
	"selector": {
		"mac": "00:23:32:2f:40:3c"
	},
	"metadata": {
		"baseurl": "http://deploy.lab:8080/assets/coreos",
		"coreos_channel": "stable",
		"coreos_version": "1409.5.0",
		"ignition_endpoint": "http://deploy.lab:8080/ignition",
		"ssh_authorized_key": "ssh-rsa AAAAB3NzaC1yc2EAAAADAQABAAAAgQCugz/eu/a6U5ZXtYVp9ufCghVSP0Lux/nP6BgbranKE6r3h3xgqo8yR2LUG9VwH6Vo+BtGgToeww+jbgr3oq9g8/mQmNvQEefvWyzhYxrpv6q36fdYS0KhQxA6vnpOZZ1M9cZ1q6iPaUryxDUFU3HULDKM4g/6XBzqBJZ2illyuw=="
	}
}
[admin@deploy ~]$ cat /var/lib/matchbox/groups/coreos-install-smpc.json
{
	"id": "coreos-install-smpc",
	"profile": "coreos-install-smpc",
	"selector": {
		"mac": "00:30:48:fb:e2:44"
	},
	"metadata": {
		"baseurl": "http://deploy.lab:8080/assets/coreos",
		"coreos_channel": "stable",
		"coreos_version": "1409.5.0",
		"ignition_endpoint": "http://deploy.lab:8080/ignition",
		"ssh_authorized_key": "ssh-rsa AAAAB3NzaC1yc2EAAAADAQABAAAAgQCugz/eu/a6U5ZXtYVp9ufCghVSP0Lux/nP6BgbranKE6r3h3xgqo8yR2LUG9VwH6Vo+BtGgToeww+jbgr3oq9g8/mQmNvQEefvWyzhYxrpv6q36fdYS0KhQxA6vnpOZZ1M9cZ1q6iPaUryxDUFU3HULDKM4g/6XBzqBJZ2illyuw=="
	}
}
We also need to make those renamed profiles. Notice the variable $net_efinet0_dhcp_mac for UEFI/Mac hardware and the $net_default_mac variable for BIOS booting hardware. Also notice that I made another unique ignition template to install to /dev/sdb instead of /dev/sda for the smpc.lab system:
[admin@deploy ~]$ cat /var/lib/matchbox/profiles/coreos-install-mp.json
{
	"id": "coreos-install",
	"ignition_id": "coreos-install.yaml.tmpl",
	"boot": {
		"kernel": "/assets/coreos/1409.5.0/coreos_production_pxe.vmlinuz",
		"initrd": [
			"/assets/coreos/1409.5.0/coreos_production_pxe_image.cpio.gz"
		],
		"args": [
			"coreos.config.url=http://deploy.lab:8080/ignition?mac=$net_efinet0_dhcp_mac",
			"coreos.first_boot=yes",
			"console=tty0",
			"console=ttyS0"
		]
	}
}
[admin@deploy ~]$ cat /var/lib/matchbox/profiles/coreos-install-smpc.json
{
	"id": "coreos-install",
	"ignition_id": "coreos-install-sdb.yaml.tmpl",
	"boot": {
		"kernel": "/assets/coreos/1409.5.0/coreos_production_pxe.vmlinuz",
		"initrd": [
			"/assets/coreos/1409.5.0/coreos_production_pxe_image.cpio.gz"
		],
		"args": [
			"coreos.config.url=http://deploy.lab:8080/ignition?mac=$net_default_mac",
			"coreos.first_boot=yes",
			"console=tty0",
			"console=ttyS0"
		]
	}
}
Once the above changes have been made, you should be able to successfully PXE/Netboot the systems and continue on with the final portion of the Tectonic installer. If you run into issues, double-check your formatting of the profiles and groups as well as hitting the /grub and /ignition endpoints with the proper parameters to see what configurations are being provided to your systems.
Congratulations! You should now be able to hit the web UI of the Tectonic Console, use kubectl, and ssh into the systems using the core user and the SSH key you supplied. I hope this helps you understand what’s going on behind a fairly sophisticated and easily customizable baremetal Container Linux and Kubernetes installation system.