MaaS Part 1 - Netboot Macs and PXEBooting PCs from Linux
When building a “Metal as a Service” (MAAS) layer, the idea is to make it very easy to go from “box to rack to ready” for a large number of servers. To make this easier and to reduce complexity at this layer, most organizations purchase one or more sets of similar servers from a single manufacturer. Depending on the level of service, they may have the manufacturer/vendor prepare the systems a certain way before they show up at the door. A technician can just unbox them, inventory the asset, slide them into the rack, cable it up, and be done with their part.
The goal is that the provisioning system picks up from the power-on event from that point on. It gets a base operating system followed by some configuration management to put it into a production state. When that system is no longer being used in that production state, it goes through a similar re-provisioning process to become useful again for another application.
Naturally, this can get out of hand without proper tooling once you go past, say, 10 servers. I’ve been doing a fair bit of reading about this, and Digital Rebar looks like the best of breed for the power and customization aspects. It’s the latest from the folks that developed Crowbar.
So why am I not going to use Digital Rebar?
Well, two reasons. I know that learning comes best from experiencing the pain firsthand. So instead of just dropping in a very impressive toolset that does 500 things more than I need, I wanted to get familiar with the handful of things I do need in a focused way. I could spend a few days installing and configuring Digital Rebar and learning the way it solves the problem while relearning all that forgotten PXEBoot knowledge from 10 years ago, or I could choose to do one thing at a time and truly understand the simplest use case.
Secondly, I have a mix of systems, and I don’t believe my use case is baked into Digital Rebar. Namely, Mac Netboot support alongside PC PXEboot support. Until I got it working, I didn’t even know if it was possible. As far as I can google, it’s not been documented anywhere public. Maybe these posts will spark a discussion of working that support into a tool like Digital Rebar, but I’m not sure of the popularity of it. I mean, most folks want to Netboot OSX on a Mac or at least dual boot with Linux, not just Linux alone.
The Problem
So, how do I get Macs and PC servers to go from bare metal to a common base Centos 7.x latest state with a known IP configuration, hostname, and SSH access booting just Linux?
- Create a deploy host.
- Install and configure a DHCP server, a TFTP server, and a Webserver
- Custom configuration
- Walking Through the Process
Deploy Host
I am using a low-power Celeron system as my base Centos 7.x system from which to develop, test, and provide netboot and pxeboot support. I had downloaded the minimal ISO from here, ran dd to write it directly to a USB, and did a manual installation of the base packages.
Finally, I gave it a static IP of 172.22.10.2/24 on the management network, added a DNS entry for the hostname called deploy on my pfsense system (172.22.10.1), and generated a new SSH keypair.
Now, from my workstation, I can SSH into the deploy system on the management network that my servers have their primary NIC attached, build, and run the containers.
Supporting Services
I’ll admit I spent over a week getting Netboot to work from a Linux DHCP server trying several angles. I tried very hard to use ipxe in several ways, but never got very far. Oddly enough, I spent only 2 hrs adding PXEBoot support to that same DHCP/TFTP setup for the PCs.
I owe all I learned about this process from:
- https://bennettp123.com/2012/05/05/booting-imac-12,1-from-isc-dhcp
- https://bitbucket.org/bruienne/bsdpy
- https://themacwrangler.wordpress.com/2015/04/24/creating-a-netboot-server-with-centos-7-and-bsdpy/
Thank you to those above who paved the way. I will take a smidge of credit for tying this all together in terms of grub2 booting over the network and figuring out the EFI stuff, but the heavy lifting and the DHCP Netboot trickery they did was pretty impressive.
Basic PXE/NetBoot Process
My hope is that understanding the boot process along with reading the comments in the handful of configuration files in the Docker containers will make things clear for anyone else attempting this.
Here’s the basic, high level process of PXE/Netbooting.
- System is booted from a NIC that supports PXEbooting. This typically means changing the boot order to have the NIC first, hitting a key to network boot just this time, or configuring a BMC or ILOM card to boot the system from the network.
- The system acquires an IP address via DHCP/Bootp. A properly configured DHCP server will respond with an IP, subnet, gateway, and file to boot from.
- Optionally, the system also asks for a pointer to a file to boot from over the network.
- If supplied by the DHCP server, the system uses the
next-serverandfilenameresults to TFTP download/run that bootable file.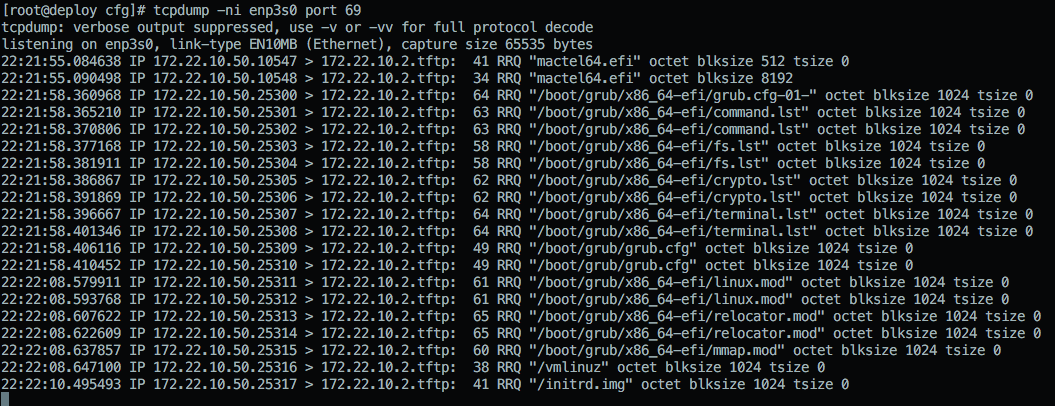
- From there, the bootable file controls the remainder of the boot process (install an OS, run an OS from memory, etc). Often, this means hosting via a web server or FTP server the configuration for installation and even a repository of all the installation packages for the OS.
Back to Configuring all this stuff
I originally got this working with the version of isc-dhcp-server, tftpd, and httpd from the Centos7.x repos installed natively on deploy, but all the working and non-working config files, log files, and such were cluttering things up. It was very difficult to iterate knowing what files were being used or not.
So, of course, I decided to address that by dockerizing those services, wiping the deploy system, and redeploying the same services from pure docker containers. By recreating all my work and encapsulating it properly into Docker containers, I have a way to share my work that folks may be able to understand.
This also means my deploy system really only needs to run Docker and the knowledge to build and run the containers from scratch can come from a git repo.
On the deploy system, it’s installation was pretty straightforward. I followed the Centos 7.x guide for getting Docker up and running at boot. I use an account named admin with sudo privileges on my deploy host, so I added admin to the docker group to avoid having to type sudo on every docker command.
What needs to be dockerized:
- DHCP - isc-dhcp-server - Provide IPs and pointers to TFTP boot files
- TFTP - tftpd-hpa - Provide bootable grub2 images and grub.cfg files
- Web - apache2 - Provide Kickstart configuration files and a local Centos 7.x mirror
- Rsync - createrepo and rsync - Run on cron to keep the mirror updated each night
Right away, we know that this can get messy really quickly. Custom DHCP configs, TFTP roots, Web roots and configurations, and of course, the 28GB of stuff in the Centos 7.x Repo in that web root. Thankfully, the process of Dockerizing forces things to be explicitly handled properly.
Here is that repository with those services broken up into three separate containers: https://github.com/bgeesaman/netpxemirror
On my deploy system, after installing Docker, I ran:
$ cd ~
$ git clone https://github.com/bgeesaman/netpxemirror.git
Cloning into 'netpxemirror'...
remote: Counting objects: 50, done.
remote: Compressing objects: 100% (34/34), done.
remote: Total 50 (delta 11), reused 47 (delta 11), pack-reused 0
Unpacking objects: 100% (50/50), done.
$ cd netpxemirror
### Configure the services to your environment ###
$ ./build.sh
$ ./run.sh
This built and ran netpxeboot, centos7mirror, and mirrorsync.
WARNING
Running the mirrorsync container for the first time will immediately begin rsyncing 28GB of data into /var/www/html/repos! I did this so that I could restore the state of a working deploy system from scratch assuming there was no local repo already. Edit the mirrorsync/files/start.sh to prevent this behavior before running build.sh.
Assuming the configuration is correct, a docker ps shows:
$ docker ps
CONTAINER ID        IMAGE               COMMAND                CREATED             STATUS              PORTS                NAMES
9bcdd7f44d38        netpxeboot          "/root/start.sh"       14 hours ago        Up 14 hours                              netpxeboot
6a1c28fdfc7a        mirrorsync          "/root/start.sh"       15 hours ago        Up 15 hours                              mirrorsync
eebd43890189        centos7mirror       "apache2-foreground"   23 hours ago        Up 23 hours         0.0.0.0:80->80/tcp   centos7mirror
Keen observers will notice that TCP port 80 is forwarded to the centos7mirror container running apache2, but UDP/67 and UDP/69 are not for netpxeboot. That’s because the netpxeboot container is started with --net=host in the docker run command so that it can bind to the host’s network stack and see broadcasts from the systems asking for IP addresses.
Containers at a Glance
centos7mirror
Based on the php:5.6-apache container, I add a custom docker-php.conf to apache and enable mod_rewrite. This makes this a PHP 5.6 webserver with the ability to serve up dynamic content based on the request data and to make the URLs cleaner.
mirrorsync
Based on phusion/baseimage, this Ubuntu based system provides a simple cron based functionality to keep the Yum repository in sync with the Centos 7.x mirror of my choice.
netpxeboot
Also based on phusion/baseimage, this Ubuntu based system provides the isc-dhcp-server, tftpd-hpa server, and the configuration files for grub booting over TFTP. A PHP script for serving custom kickstart files out of the webroot in centos7mirror based on mac address is also here.
Custom Configuration
Now, there’s probably a 100% chance that the containers didn’t work for you if you simply git cloned them and tried building them. So, I’ll point you to each of the places that you’ll want to edit for your needs. Namely, the IP addresses, paths, and URLs for things. I’ll start with the local mirror and mirror syncing process.
centos7mirror
Realistically, there is very little to configure here with the exception of the web root and the name of the file you want associated with serving kickstart configurations. I chose /var/www/html since it’s the default for the web root. Also, the ks.cfg mod_rewrite rule actually calls the /var/www/html/ks.php file for knowing what kickstart to serve up. ks.php is put into place by netpxeboot on its first run.
mirrorsync
If you edited the web root path, you’ll need to search/replace it in all the files in the files directory. Mostly, though, you’ll want to edit the cron.sh file to pull from another repo and crontab to adjust the schedule of when the sync happens.
11 1 * * * root /root/cron.sh >> /var/log/cron.log 2>&1
Means it runs on the eleventh minute of the first hour of every day. I tend to use slighty “off” times to avoid contention with other folks who run their jobs on the hour exactly.
netpxeboot
The files ADDed in the Dockerfile into this container are the primary points of configuration, but I’ll warn you that making one incorrect change here can easily break things.
ks.php serves up kickstart files in /var/www/html/cfg/ma:ca:dd:re:ss.cfg based on the mac address sent in the header as configured from the grub.cfg option called inst.ks.sendmac
tftpd-hpa specifies mostly the base path of the TFTP files. In my case, /nbi
dhcpd.conf is where the PXE/Netbooting magic happens. Reserved IPs, lease times and ranges, paths, and more go here. If you don’t have PCs, remove the pc class block. If you don’t have Macs, remove the entire netboot class block.
  1 # dhcpd.conf
  2
  3 option domain-name "example.org";
  4 option domain-name-servers ns1.example.org, ns2.example.org;
  5 default-lease-time 3600;
  6 max-lease-time 7200;
  7 ddns-update-style none;
  8 ddns-updates off;
  9 ignore client-updates;
 10 allow booting;
 11 allow bootp;
 12 authoritative;
 13 log-facility local7;
 14 boot-unknown-clients on;
 15 ping-check off;
 16 allow-unknown-clients;
 17 allow-known-clients;
 18
 19 subnet 172.22.10.0 netmask 255.255.255.0 {
 20   range 172.22.10.5 172.22.10.30;
 21   range dynamic-bootp 172.22.10.31 172.22.10.49;
 22   allow booting;
 23   allow bootp;
 24   option domain-name-servers 172.22.10.1;
 25   option domain-name "lonimbus.com";
 26   option routers 172.22.10.1;
 27   option broadcast-address 172.22.10.255;
 28   default-lease-time 6000;
 29   max-lease-time 7200;
 30 }
 31 host mp {
 32   hardware ethernet 00:23:32:2f:40:3c;
 33   fixed-address 172.22.10.50;
 34 }
 35 host mm1 {
 36   hardware ethernet a8:20:66:34:ff:e9;
 37   fixed-address 172.22.10.51;
 38 }
 39 host mm2 {
 40   hardware ethernet a8:20:66:4a:ce:46;
 41   fixed-address 172.22.10.52;
 42 }
 43 host mm3 {
 44   hardware ethernet a8:20:66:4a:d9:da;
 45   fixed-address 172.22.10.53;
 46 }
 47 host smpc {
 48   hardware ethernet 00:30:48:fb:e2:44;
 49   fixed-address 172.22.10.54;
 50 }
 51 host sm1 {
 52   hardware ethernet 00:25:90:96:c4:9a;
 53   fixed-address 172.22.10.55;
 54 }
 55 host sm2 {
 56   hardware ethernet 00:25:90:96:c6:5a;
 57   fixed-address 172.22.10.56;
 58 }
 59 host d1 {
 60   hardware ethernet bc:30:5b:e5:73:b7;
 61   fixed-address 172.22.10.57;
 62 }
 63 host d2 {
 64   hardware ethernet bc:30:5b:e5:75:28;
 65   fixed-address 172.22.10.58;
 66 }
 67
 68 class "pc" {
 69   match if substring(option vendor-class-identifier, 0, 20) = "PXEClient:Arch:00000";
 70     filename "boot/grub/i386-pc/core.0";
 71     next-server 172.22.10.2;
 72 }
 73 class "netboot" {
 74     match if substring (option vendor-class-identifier, 0, 9) = "AAPLBSDPC";
 75     option dhcp-parameter-request-list 1,3,17,43,60;
 76
 77     if (option dhcp-message-type = 1) {
 78         option vendor-class-identifier "AAPLBSDPC";
 79         option vendor-encapsulated-options
 80             08:04:81:00:00:89;    # bsdp option 8 (length 04) -- selected image id;
 81     } elsif (option dhcp-message-type = 8) {
 82         option vendor-class-identifier "AAPLBSDPC";
 83         if (substring(option vendor-encapsulated-options, 0, 3) = 01:01:01) {
 84             log(debug, "bsdp_msgtype_list");
 85
 86             # bsdp image list message:
 87             # one image, plus one default image (both are the same)
 88             option vendor-encapsulated-options
 89                 01:01:01:                              # bsdp_msgtype_list
 90                 04:02:                                 # bsdp option code 4 (length 02) server priority
 91                     80:00:                             #  Priority (32768)
 92                 07:04:                                 # bsdp option code 7 (length 04) default image id
 93                     81:00:00:89:                       #  Image ID (137)
 94                 09:0e:                                 # bsdp option code 9 (length 0e) image list
 95                     81:00:00:89:                       #  Image ID (137)
 96                         09:54:68:65:2d:49:6d:61:67:65; #   Name (length 09) 'The-Image'
 97         } else {
 98             log(debug, "bspd_msgtype_select");
 99
100             # details about the selected image
101             option vendor-encapsulated-options
102                 01:01:02:                       # bsdp_msgtype_select
103                 08:04:                          # bsdptag_selected_boot_image
104                     81:00:00:89:                #  Image ID (137)
105                 82:09:                          # Machine Name (length 09)
106                     54:68:65:2d:49:6d:61:67:65; #  'The-Image'
107
108             if (substring(option vendor-class-identifier, 10, 4) = "i386") {
109                 filename "mactel64.efi";
110                 next-server 172.22.10.2;
111             }
112         }
113     }
114 }
grub.cfg-net gets baked into the mactel64.efi file served up for macs
 1 insmod efi_gop
 2 insmod efi_uga
 3 insmod video_bochs
 4 insmod video_cirrus
 5 insmod all_video
 6 set gfxpayload=keep
 7 insmod gzio
 8 insmod part_gpt
 9 insmod ext2
10
11 insmod net
12 insmod efinet
13 insmod tftp
14
15 net_bootp efinet0
16
17 set net_default_server=172.22.10.2
18
19 configfile (tftp)/boot/grub/x86_64-efi/grub.cfg-01-$net_efinet0_mac
grub.cfg-* gets pulled via TFTP depending on architecture by the grub2 image first pulled via DHCP. Notice the URLs, IPs, and paths to ks.cfg here.
 1 set default="0"
 2
 3 insmod video_bochs
 4 insmod video_cirrus
 5 insmod all_video
 6 set gfxpayload=keep
 7 insmod gzio
 8 insmod part_gpt
 9 insmod ext2
10
11 set timeout=10
12
13 menuentry 'Unattended Centos 7 Install' --class os {
14      insmod net
15      insmod tftp
16      # TFTP server
17      set net_default_server=172.22.10.2
18
19      echo 'Network status: '
20      net_ls_cards
21      net_ls_addr
22      net_ls_routes
23
24      echo 'Loading Linux ...'
25      #linux (tftp)/vmlinuz noipv6 inst.repo=http://centos.aol.com/7/os/x86_64/ inst.ks=http://172.22.10.2/ks.cfg inst.ks.sendmac
26      linux (tftp)/vmlinuz noipv6 inst.repo=http://deploy/repos/centos/7/os/x86_64/ inst.ks=http://deploy/ks.cfg inst.ks.sendmac
27      echo 'Loading initial ramdisk ...'
28      initrd (tftp)/initrd.img
29 }
start.sh the entry point of the container. Lots of one-time setup steps here necessary for successful operation. Change paths/URLs carefully here.
 1 #!/bin/bash
 2
 3 set -euo pipefail
 4
 5 TFTPPATH="/nbi"
 6
 7 if [ ! -d /var/www/html/cfg ]; then
 8   mkdir -p /var/www/html/cfg
 9   cp -R /root/cfg/* /var/www/html/cfg/
10 fi
11 if [ ! -f /var/www/html/index.html ]; then
12   cp /root/index.html /var/www/html/index.html
13   chmod 644 /var/www/html/index.html
14 fi
15 if [ ! -f /var/www/html/ks.php ]; then
16   cp /root/ks.php /var/www/html/ks.php
17   chmod 644 /var/www/html/ks.php
18 fi
19
20 if [ ! -f $TFTPPATH/grub.cfg-net ]; then
21   cp /root/grub.cfg-net $TFTPPATH/grub.cfg-net
22   chmod 644 $TFTPPATH/grub.cfg-net
23 fi
24
25 # Generate mactel boot efi
26 if [ ! -f $TFTPPATH/mactel64.efi ]; then
27   grub-mkimage -d /usr/lib/grub/x86_64-efi/ -O x86_64-efi -o $TFTPPATH/mactel64.efi -p '(tftp)/boot/grub' -c $TFTPPATH/grub.cfg-net normal configfile net efinet tftp efi_gop efi_uga all_video gzio part_gpt ext2 echo linuxefi
28 fi
29 if [ ! -d $TFTPPATH/boot/grub ]; then
30   grub-mknetdir --net-directory=$TFTPPATH
31 fi
32
33 cp /root/grub.cfg-i386-pc $TFTPPATH/boot/grub/i386-pc/grub.cfg
34 cp /root/grub.cfg-i386-pc $TFTPPATH/boot/grub/grub.cfg
35 cp /root/grub.cfg-x86_64-efi $TFTPPATH/boot/grub/x86_64-efi/grub.cfg
36
37 if [ ! -f $TFTPPATH/initrd.img ]; then
38   wget --quiet -O $TFTPPATH/initrd.img http://centos.aol.com/7/os/x86_64/isolinux/initrd.img
39 fi
40 if [ ! -f $TFTPPATH/vmlinuz ]; then
41   wget --quiet -O $TFTPPATH/vmlinuz http://centos.aol.com/7/os/x86_64/isolinux/vmlinuz
42 fi
43
44 # Start dhcp and tftpd
45 /etc/init.d/isc-dhcp-server start
46 /etc/init.d/tftpd-hpa start
47
48 echo "Tailing logs..."
49 tail -f /var/log/syslog
Walking Through the Process
Step 1:
Boot the system from the network. My Dells and SuperMicros use f12 and the Macs have you hold n right at and slightly after the boot chime. Helps to have a keyboard and mouse on these systems as you iterate.
Step 2:
On the deploy system, you can run: tcpdump -ni eth0 not port 22 to watch the process unfold. This is my primary method of debugging along with watching the screen as it boots. You’ll see the system request an address via DHCP. If your DHCP server is configured and listening correctly, you’ll see it respond with a DHCP reply. On your PC system, you should see something indicating it got an IP. Macs just show the blinking globe by default unless you enable verbose booting.
Step 3:
Very shortly after the DHCP lease is acquired, you’ll see a TFTP RRQ for the boot/grub/i386-pc/core.0 or mactel64.efi binary. Both of them should initialize grub on the system to a point that it can look for its proper grub.cfg file on that same TFTP server. In that tcpdump output, you’ll see the file grabs over UDP/69 and the paths/names requested. You can narrow things down to only what’s being pulled via TFTP by running tcpdump -ni eth0 port 69 if you are having pathing or file name issues.
Step 4:
After it grabs the second grub.cfg via TFTP, it follows the instructions contained in it. In our case, it’s to load the vmlinuz and initrd.img from TFTP (again) and to boot from them with some additional options.
Step 5:
inst.repo and inst.ks are the custom boot options used here to specify where to get the base installation packages and the installation configuration files, respectively. Both are served via apache out of the centos7mirror container.
Step 6:
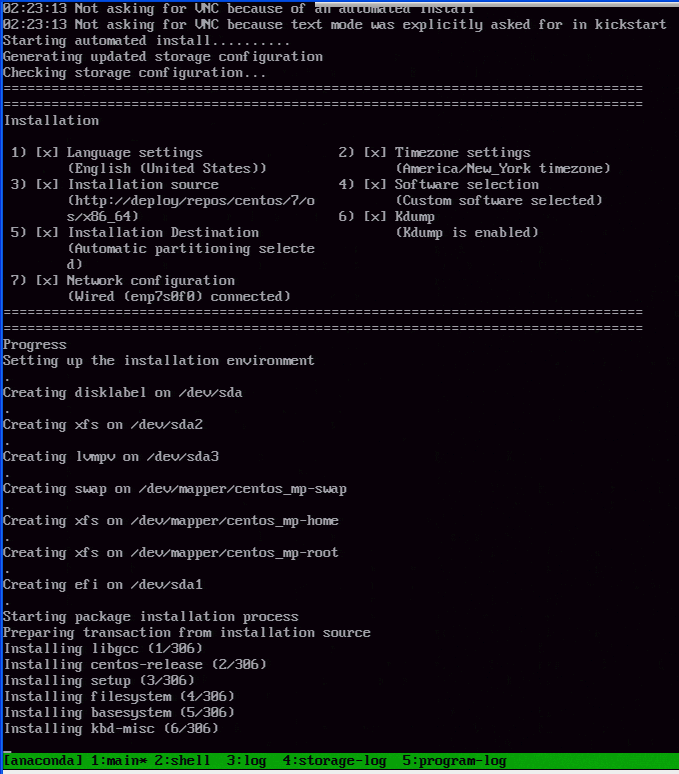
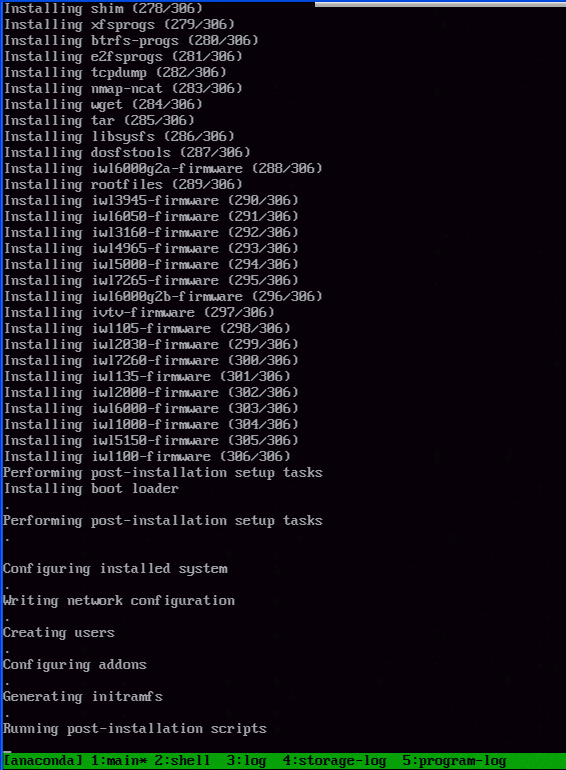
From this point, it’s a normal Kickstart and Centos 7.x installation process.